Steps for Creating and Removing Custom Action Handlers in DLLs or OCX Files

Steps for Creating and Removing Custom Action Handlers in DLLs or OCX Files
Disclaimer: This post includes affiliate links
If you click on a link and make a purchase, I may receive a commission at no extra cost to you.
DLL/OCX register/unregister
Object Linking and Embedding (OLE) is a proprietary Microsoft technology that allows developers to embed and link to other objects. With OLE Control Extension (OCX), you can develop and use custom user interface elements. You can also achieve OLE controls via Dynamic-Link Library(.dll) files.
However, to make sure the data transfer between applications work , these OLE controls must be registered on the system. How can we do that? That’s what we will show you in this article.
What is the Regsvr32 tool?
Regsvr32 is a command-line utility that allows registering and unregistering OLE controls such as DLLs and ActiveX controls in the Windows Registry. Regsvr32 can be found in:
- For 64-bit version: %systemroot%\System32\regsvr32.exe
- For 32-bit version: %systemroot%\SysWoW64\regsvr32.exe
The syntax of the Regsvr32 is actually quite simple:
Regsvr32 [/u] [/n] [/i[:cmdline]]
/u - Unregister control
/i - Call DllInstall passing it an optional [cmdline]; when it is used with /u, it calls dll uninstall
/n - do not call DllRegisterServer; this option must be used with /i
/s – Silent
/e - Suppress only the GUI success message but shows the GUI error message
Regsvr32 must always be used from an elevated command prompt.
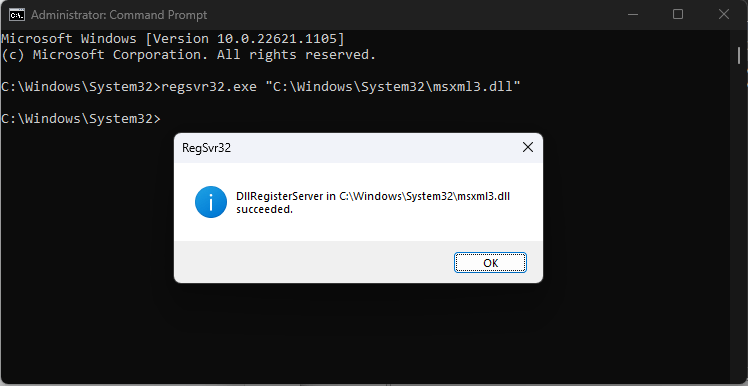
For example, to register a DLL/OCX, you can use:
Regsvr32.exe PATHTODLL\name.DLL
Copy
To unregister a DLL/OCX, you can use:
Regsvr32.exe /U PATHTODLL\name.DLL
Copy
How to Register DLL/OCX with VBscript?
Now that we know about the Regsvr32 utility, we can build the following scenario. Let’s assume that we have a DLL in our project which will be installed in %systemroot%\DLL. So, we can create the following registration script:
Option Explicit
On Error Resume Next
Dim strCmd,WshShell,strInstalldir
Set WshShell = CreateObject(“WScript.Shell”)
strSysRoot = WshShell.ExpandEnvironmentStrings(“%SYSTEMROOT%”)
strInstalldir = strSysRoot & “\DLL”
strCmd = “regsvr32.exe “ & chr(34) & strInstalldir & “\libifcoremd.dll” & chr(34)& “ /s”
WshShell.Run strCmd
Copy
The script performs the following actions:
- Option Explicit: This statement enforces variable declaration in the script, ensuring that all variables are explicitly declared before they are used.
- On Error Resume Next: This statement allows the script to continue running even if an error occurs, bypassing the error and continuing with the next line of code.
- Dim strCmd, WshShell, strInstalldir: Declares three variables: strCmd to hold the command to be executed, WshShell to access the Windows Script Host Shell object, and strInstalldir to store the path to the DLL file.
- Set WshShell = CreateObject(“WScript.Shell”): Creates an instance of the Windows Script Host Shell object, which allows the script to run shell commands and interact with the Windows environment.
- strSysRoot = WshShell.ExpandEnvironmentStrings(“%SYSTEMROOT%”): Retrieves the value of the %SYSTEMROOT% environment variable using the ExpandEnvironmentStrings method of the WshShell object. The %SYSTEMROOT% variable represents the path to the Windows installation directory.
- strInstalldir = strSysRoot & “\DLL”: Constructs the path to the DLL file by appending the “\DLL” folder to the strSysRoot variable. This assumes that the DLL file is located in the “DLL” folder within the Windows installation directory.
- strCmd = “regsvr32.exe “ & chr(34) & strInstalldir & “\libifcoremd.dll” & chr(34) & “ /s”: Constructs the command to be executed. It uses the regsvr32.exe utility to register a DLL file (libifcoremd.dll). The path to the DLL file is obtained by combining strInstalldir with the relative path \libifcoremd.dll. The chr(34) is used to insert double quotes into the command string, and /s is a parameter to silently register the DLL without displaying any user interface.
- WshShell.Run strCmd: Executes the command stored in the strCmd variable using the Run method of the WshShell object. This runs the command in a separate process.
To unregister the DLL, we can use the following script:
Option Explicit
On Error Resume Next
Dim strCmd,WshShell,strInstalldir
Set WshShell = CreateObject(“WScript.Shell”)
strSysRoot = WshShell.ExpandEnvironmentStrings(“%SYSTEMROOT%”)
strInstalldir = strSysRoot & “\DLL”
strCmd = “regsvr32.exe /U “ & chr(34) & strInstalldir & “\libifcoremd.dll” & chr(34)& “ /s”
WshShell.Run strCmd
Copy
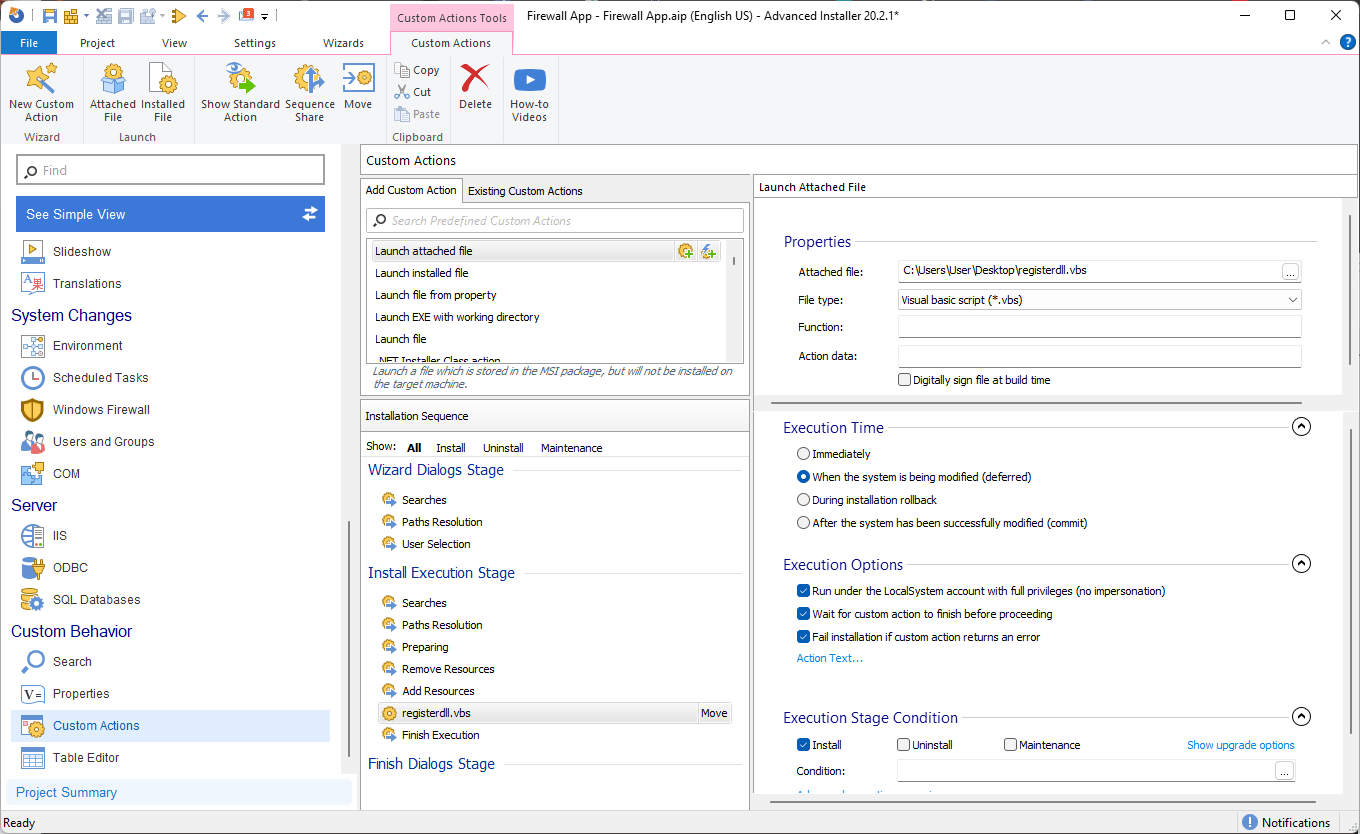
- Now that the scripts are created, we need to open Advanced Installer and navigate to the Custom Actions page.
- There, search for the Launch attached file predefined custom action and add it into the sequence.
- Select your previously created registration script and configure the custom action as follows:
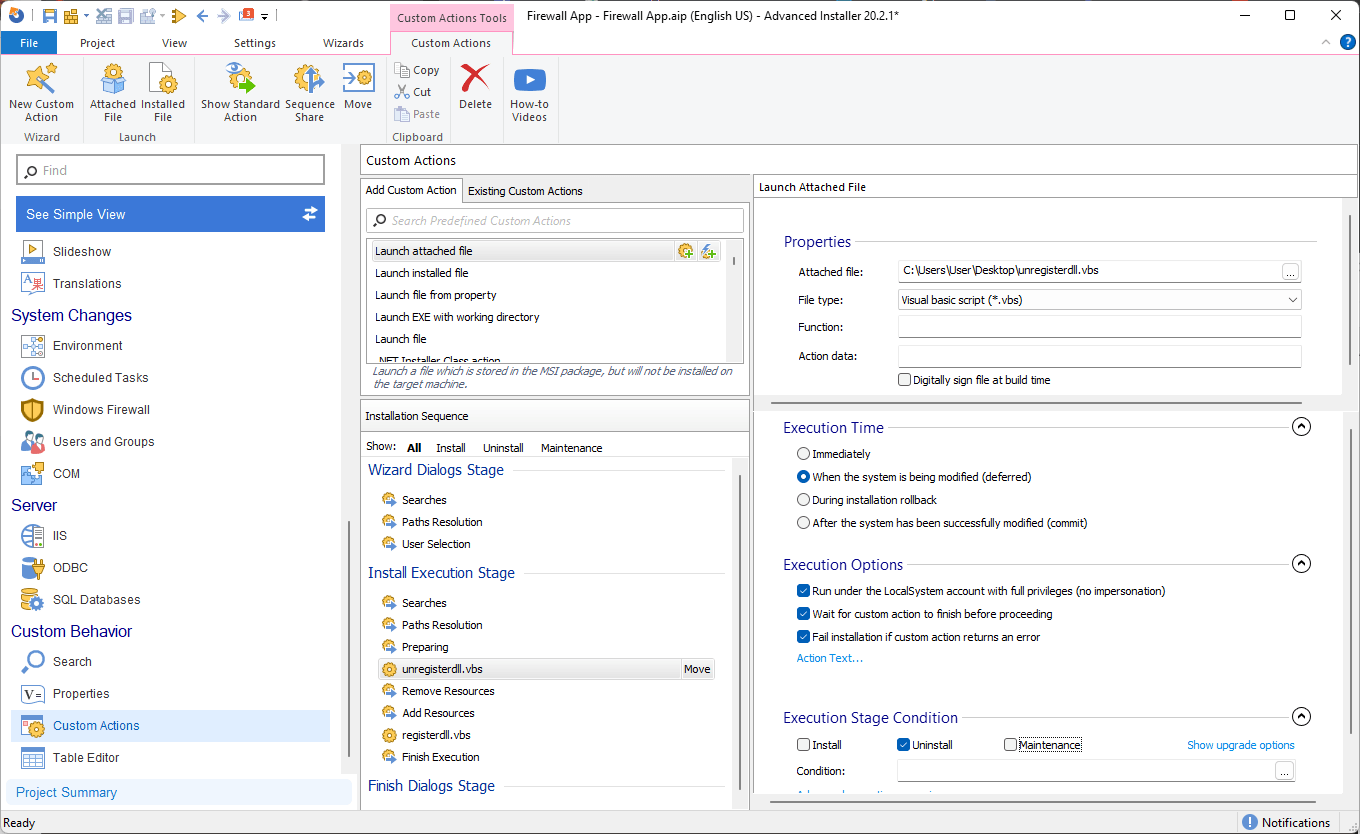
We also want to unregister the DLL during uninstallation, so let’s create another custom action the same way as we did previously. Except this time, select the unregister script and configure the Custom Action as seen below:
And that is it, all you need to do is Build the MSI and install it. The DLL will be registered.
How to Register DLL/OCX with PowerShell?
Using the same logic as above, we can construct the following script to register a DLL with PowerShell:
$Arguments = “C:\Windows\DLL\libifcoremd.dll”, “/s”
Start-Process -FilePath ‘regsvr32.exe’ -Args $Arguments -Wait -NoNewWindow -PassThru
Copy
The script performs the following actions:
- $Arguments: Declares a variable to hold the arguments for the regsvr32.exe command and assigns the arguments to be passed to the regsvr32.exe command. The first argument is the path to the DLL file (C:\Windows\DLL\libifcoremd.dll), and the second argument (/s) is a parameter to silently register the DLL without displaying any user interface.
- Start-Process -FilePath ‘regsvr32.exe’ -Args $Arguments -Wait -NoNewWindow -PassThru: Executes the regsvr32.exe command using the Start-Process cmdlet. The -FilePath parameter specifies the path to the executable (regsvr32.exe). The -Args parameter specifies the arguments to be passed to the executable, which are stored in the $Arguments variable. The -Wait parameter ensures that the script waits for the command to complete before continuing. The -NoNewWindow parameter prevents the command from opening a new window. The -PassThru parameter returns an object representing the newly created process, allowing for further interaction if needed.
To unregister the DLL, we can use the following script:
$Arguments = “/u”,”C:\Windows\DLL\libifcoremd.dll”, “/s”
Start-Process -FilePath ‘regsvr32.exe’ -Args $Arguments -Wait -NoNewWindow -PassThru
Copy
- When the scripts are created, we navigate to the Custom Actions page.
- Search for the Run PowerShell script file predefined Custom Action and add it in the sequence.
- Once we select the registration PowerShell script, we can proceed to configure the Custom Actions as follows:
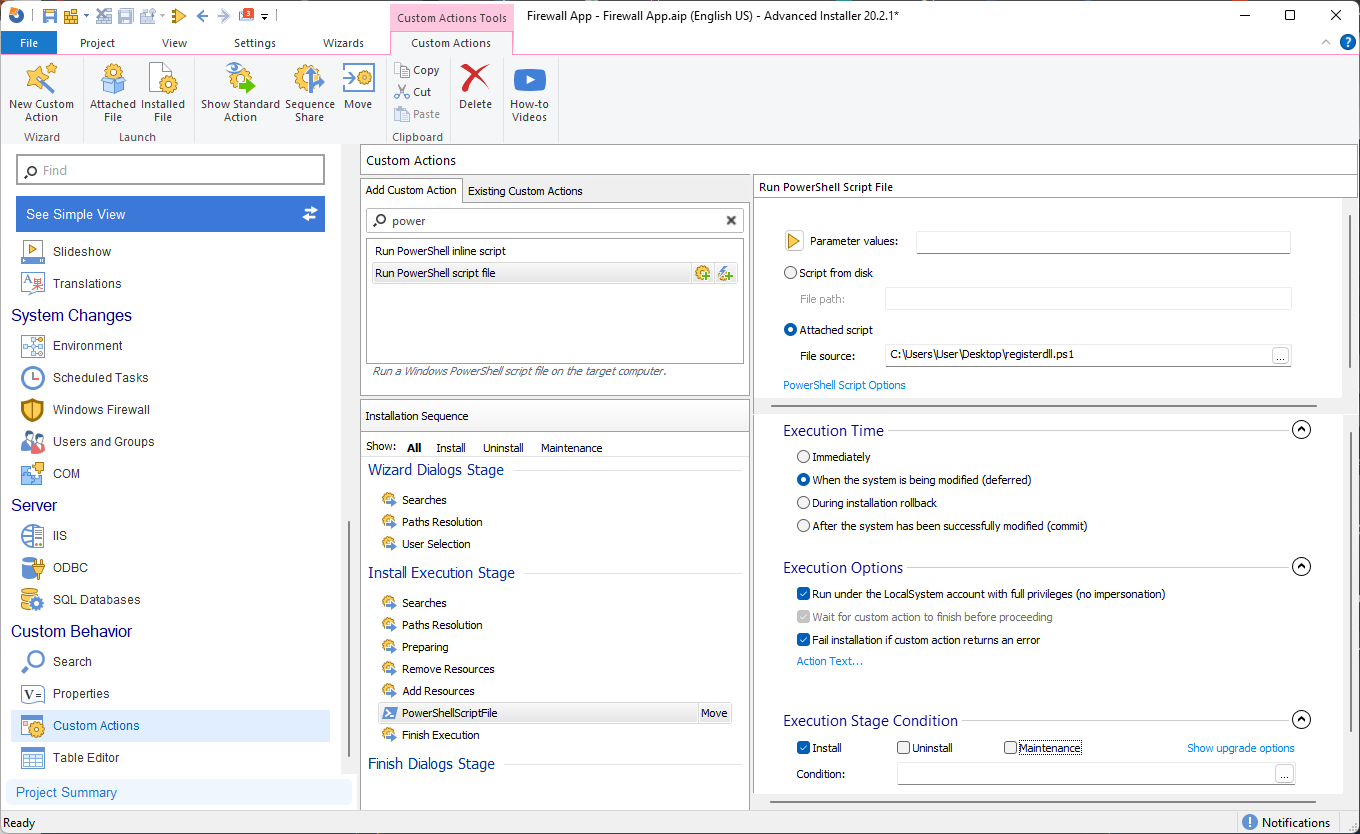
For the unregister action, we follow the same steps as above and configure the Custom Actions:
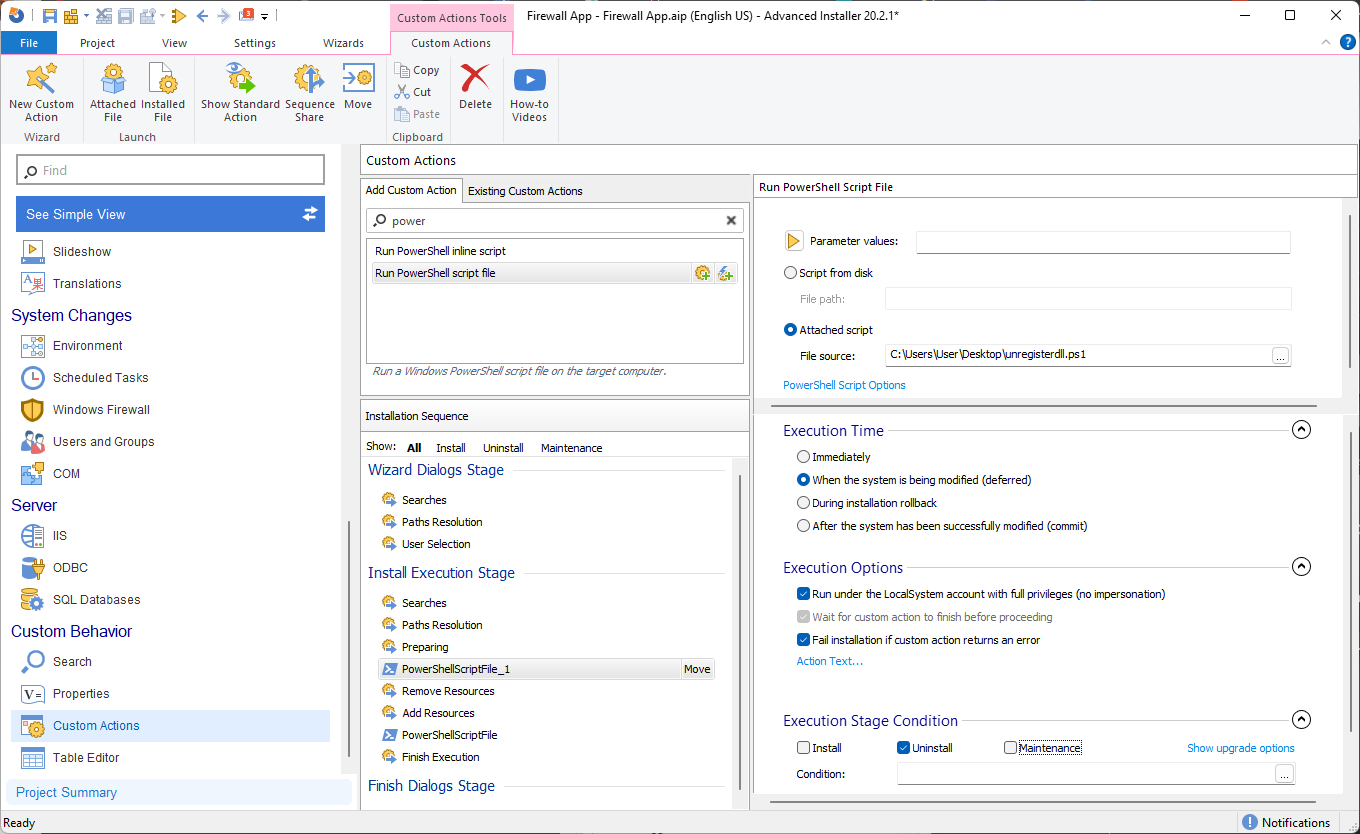
And you’re done, now you can Build the MSI and install it. The DLL will be registered.
How to Register DLL/OCX with Advanced Installer?
Advanced Installer makes it much easier to handle OLE control registration by providing a Registration Tab GUI .
Accessing the GUI is quite easy with these steps:
- First navigate to the Files and Folders page
- Add the DLL/OCX files.
- Once the files are added, right-click on the DLL/OCX and select Properties.
- Then, navigate to the Registration Tab.
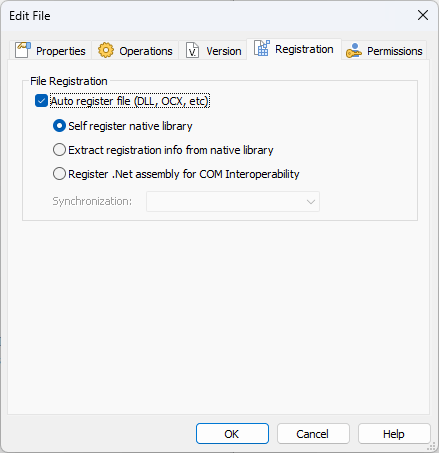
As you may notice, there are three methods for registering files, two for native libraries and one for .NET assemblies.
- Self-register native library
This file is marked for self-registration, however, the self-registration method for registering components has many drawbacks (like not being able to roll back the changes if something fails later in the install) and it is against Microsoft guidelines.
- Extract registration info from the native library
All the necessary registry entries and keys are installed separately. You can see them in the Registry and COM pages. This is the preferred way to register a file.
- Register .NET assembly for COM interoperability
It creates the required registry entries so that your assembly is operable through COM. You can see those registry entries in the Registry page.
Also read:
- [New] ChuckleCraft Pixel-Perfect Humor
- [New] Methods for a No-Ads Experience on Social Platforms for 2024
- Custom Action-Enabled Process Detection & Termination Techniques
- Get Fluent in Swedish Script & Sounds Speedily
- How Nubia Z50 Ultra Mirror Screen to PC? | Dr.fone
- How Protected Are Your Files on Windows 10? Expert Advice From MalwareFox
- Master the Solution: A Detailed Guide to Prevent FIFA 21 Game Crashes on PC
- Simple Steps to Unlock Your iPhone 6: A Beginner's Manual
- Step-by-Step Guide: Transferring Your Redmi Smartphone Data to Your Computer
- Ultimate Guide to Capturing Screenshots on Your Alcatel One Touch Device
- Updated In 2024, Comparing Titans in Digital Audio Workstations Is MAGIX Samplitude at the Pinnacle?
- Title: Steps for Creating and Removing Custom Action Handlers in DLLs or OCX Files
- Author: Larry
- Created at : 2024-10-03 20:51:52
- Updated at : 2024-10-10 21:14:51
- Link: https://win-updates.techidaily.com/steps-for-creating-and-removing-custom-action-handlers-in-dlls-or-ocx-files/
- License: This work is licensed under CC BY-NC-SA 4.0.