
Implementing Tailored Responses: Identify & Halt System Processes

Implementing Tailored Responses: Identify & Halt System Processes
Disclaimer: This post includes affiliate links
If you click on a link and make a purchase, I may receive a commission at no extra cost to you.
Process handling
The custom actions topic is one that most beginner IT Professionals tend to avoid and it’s to be understood because MSI technology is a very complex topic , not to mention the best practices that were developed during the years and somehow expected for the uninitiated to implement in their installers.
So let’s start an article series where we touch 9 of the most popular custom actions that are used in the industry. In these articles we will have a look on how you can implement them easily with Advanced Installer but also by using VBScript or PowerShell custom actions.
Terminate Process in Advanced Installer
The terminate process custom action is something very often used when it comes to installers because you would like to close any running processes from your application before you start the installation or uninstallation. This ensures that no other files are in use during the installation/uninstallation operation and ensures a higher success rate of your installation.
For example, let’s say I want to terminate the notepad.exe process. With Advanced Installer its quite easy:
1. Navigate to the Custom Actions Page
2. Search for “Terminate Process” custom action and add it in sequence
3. Type the process name (in our case notepad.exe)
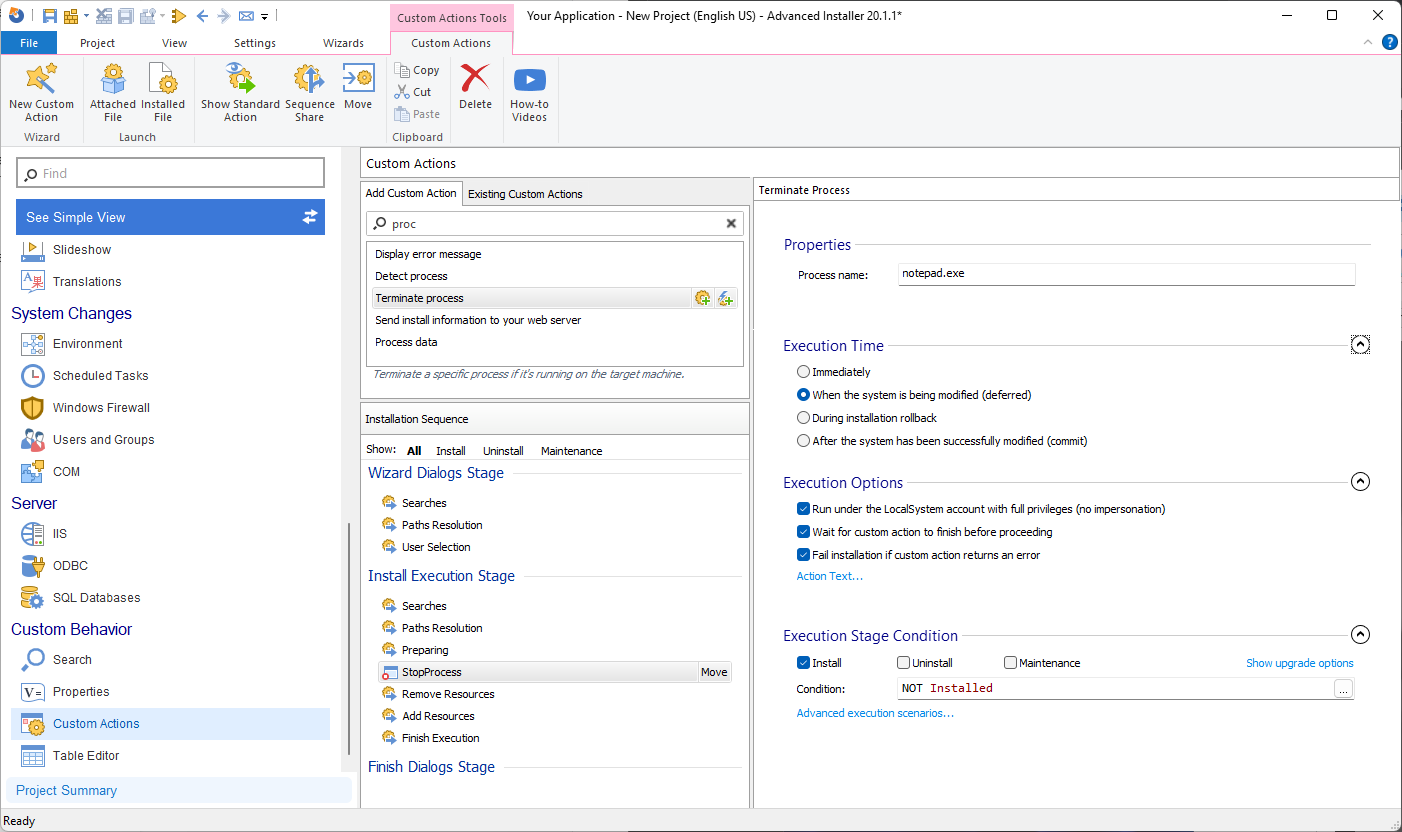
4. Build and run the installation
The above example is configured to run only during the installation. If you want to run the same action during the uninstall sequence check the “Uninstall” checkbox and under condition modify to the following:
NOT Installed OR REMOVE~=ALL
Copy
Terminate Process with VBScript
If you want to use VBScript to close a specific process, this is quite easy to accomplish. There are two ways to do this:
1. Using the taskkill command available in cmd
Dim oSH
Dim returnVal
Dim shellCommand
Set oSH = CreateObject(“WScript.Shell”)
shellCommand = “cmd.exe /c taskkill /f /fi “ & Chr(34) & “notepad.exe” & Chr(34) & “ /t”
returnVal = osh.Run (shellCommand, 0, true)
Set oSH = nothing
Copy
This VBScript code is used to terminate all instances of the “Notepad.exe” process running on a Windows computer. Here’s a breakdown of what each line does:
- Dim oSH: Declares a variable oSH to hold a reference to the Windows Script Host object.
- Dim returnVal: Declares a variable returnVal to hold the return value of the Run method.
- Dim shellCommand: Declares a variable shellCommand to store the command that will be executed in the command prompt.
- Set oSH = CreateObject(“WScript.Shell”): Creates an instance of the WScript.Shell object and assigns it to the variable oSH. This object provides access to the Windows command prompt.
- shellCommand = “cmd.exe /c taskkill /f /fi “ & Chr(34) & “notepad.exe” & Chr(34) & “ /t”: Sets the shellCommand variable to a command that will be executed in the command prompt. The command uses taskkill to forcefully terminate any process with the name “notepad.exe”.
- returnVal = osh.Run(shellCommand, 0, true): Executes the shellCommand in the command prompt. The Run method launches a new process and waits for it to complete before continuing (true argument). The return value of the Run method is stored in the returnVal variable.
- Set oSH = nothing: Releases the reference to the WScript.Shell object.
To learn more parameters for the taskkill utility type taskkill.exe /? In
2. Using the Win32_Process via WMI query
strComputer = “.”
Set objWMIService = GetObject(“winmgmts:” _
& “{impersonationLevel=impersonate}!\“ & strComputer & “\root\cimv2”)
Set colProcessList = objWMIService.ExecQuery _
(“Select * from Win32_Process Where Name = ‘Notepad.exe’”)
For Each objProcess in colProcessList
objProcess.Terminate()
Next
Copy
This VBScript code is used to terminate all instances of the “Notepad.exe” process running on a local computer. Here’s a breakdown of what each line does:
- strComputer = “.”: Sets the strComputer variable to the local computer.
- Set objWMIService = GetObject(“winmgmts:{impersonationLevel=impersonate}!\\“ & strComputer & “\root\cimv2”): Establishes a connection to the Windows Management Instrumentation (WMI) service on the local computer. It uses the GetObject method to retrieve the WMI service object, specifying the impersonation level as “impersonate” to ensure the script runs with the necessary permissions.
- Set colProcessList = objWMIService.ExecQuery(“Select * from Win32_Process Where Name = ‘Notepad.exe’”): Executes a WMI query to retrieve all instances of the “Notepad.exe” process running on the local computer. The results are stored in the colProcessList collection.
- For Each objProcess in colProcessList: Loops through each process in the colProcessList collection.
- objProcess.Terminate(): Terminates the process represented by the current objProcess object.
- Next: Moves to the next process in the colProcessList collection and repeats the loop.
In both cases you will get the same result with notepad.exe being stopped, however for more complex operations the Win32_Process route is preferred. We will touch on the Win32_Process a bit later in this article when it comes to a specific type of process closure.
Once you have your VBScript ready, open Advanced Installer and perform the following steps:
1. Navigate to the Custom Actions Page
2. Search for “Launch Attached File” and add it to the sequence
3. A window will appear to chose the previously created VBScript
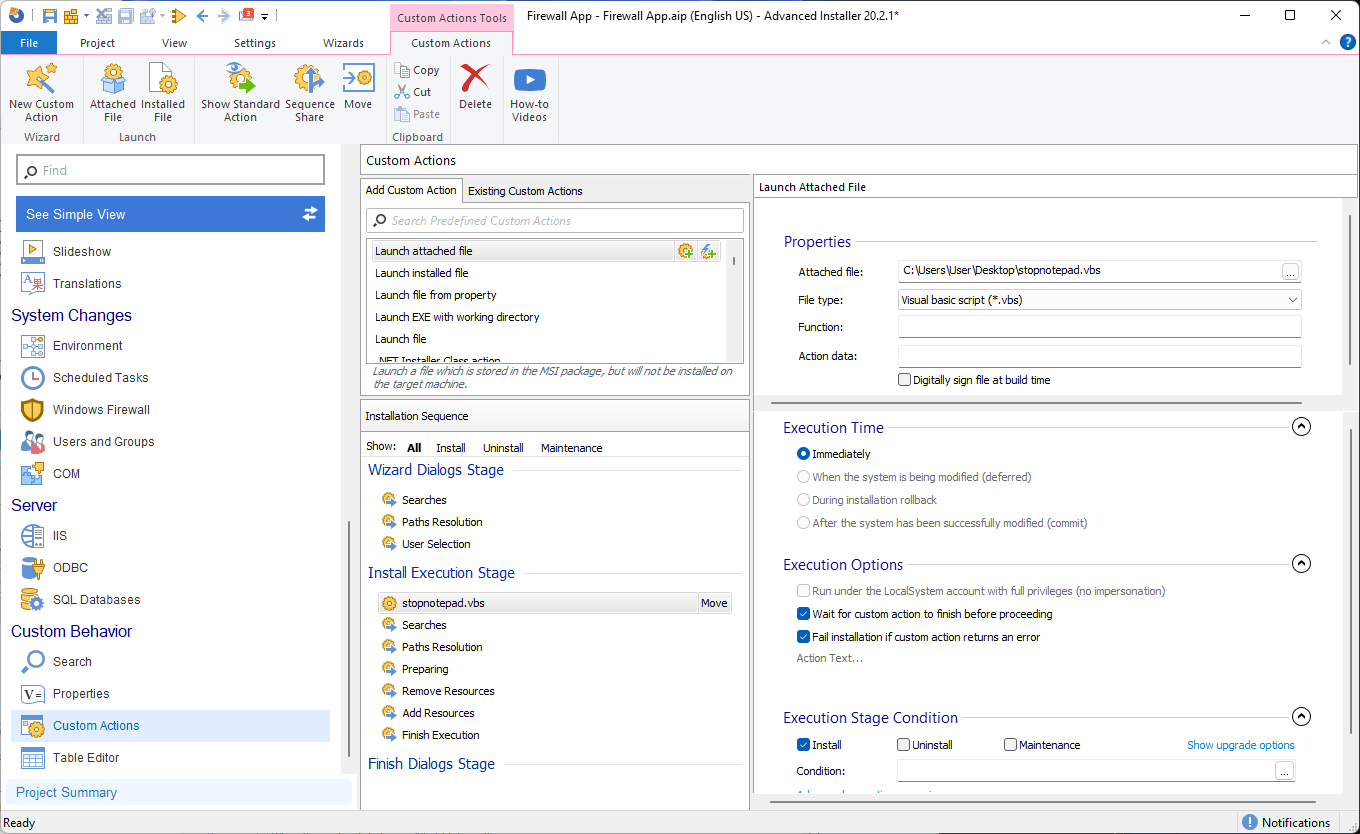
4. Build and run the installer
Terminate Process with PowerShell
Similar to VBScript, there are two ways in which you are able to terminate a process with PowerShell.
1. Using the taskkill command
Same as VBScript, but with PowerShell it’s even easier. All you need to type in a PowerShell script is:
taskkill /f /im notepad.exe /t
Copy
2. Using the Stop-Process cmdlet
Stop-process -name notepad -Force
Copy
Both the TASKKILL and Stop-Process allow you to kill a process forcefully with a PID or name**.** The difference in Stop-Process is that you can define a process object (a variable or command), but you can’t define other objects such as system name, username, or password, as you would in the TASKKILL command.
However, Stop-Process helps you create an autonomous task with scripting powers. For example, the “-passthru” parameter allows you to return objects from commands, which you can later use for scripting. The Stop-Process also includes two risk mitigation parameters (-WhatIf) and (-Confirm) to avoid the Stop-Process from unwanted changes on the system.
As you can see the difference between the number of lines needed for VBScript and PowerShell is quite big. Again, both of the above commands achieve the same result, it’s up to you to decide which is best for you.
Once you have your PowerShell script ready, open Advanced Installer and perform the following steps:
1. Navigate to the Custom Actions Page
2. Search for “Run PowerShell script file” and add it to the sequence
3. Select “Attached Script”
4. A window will appear to chose the previously created PowerShell script
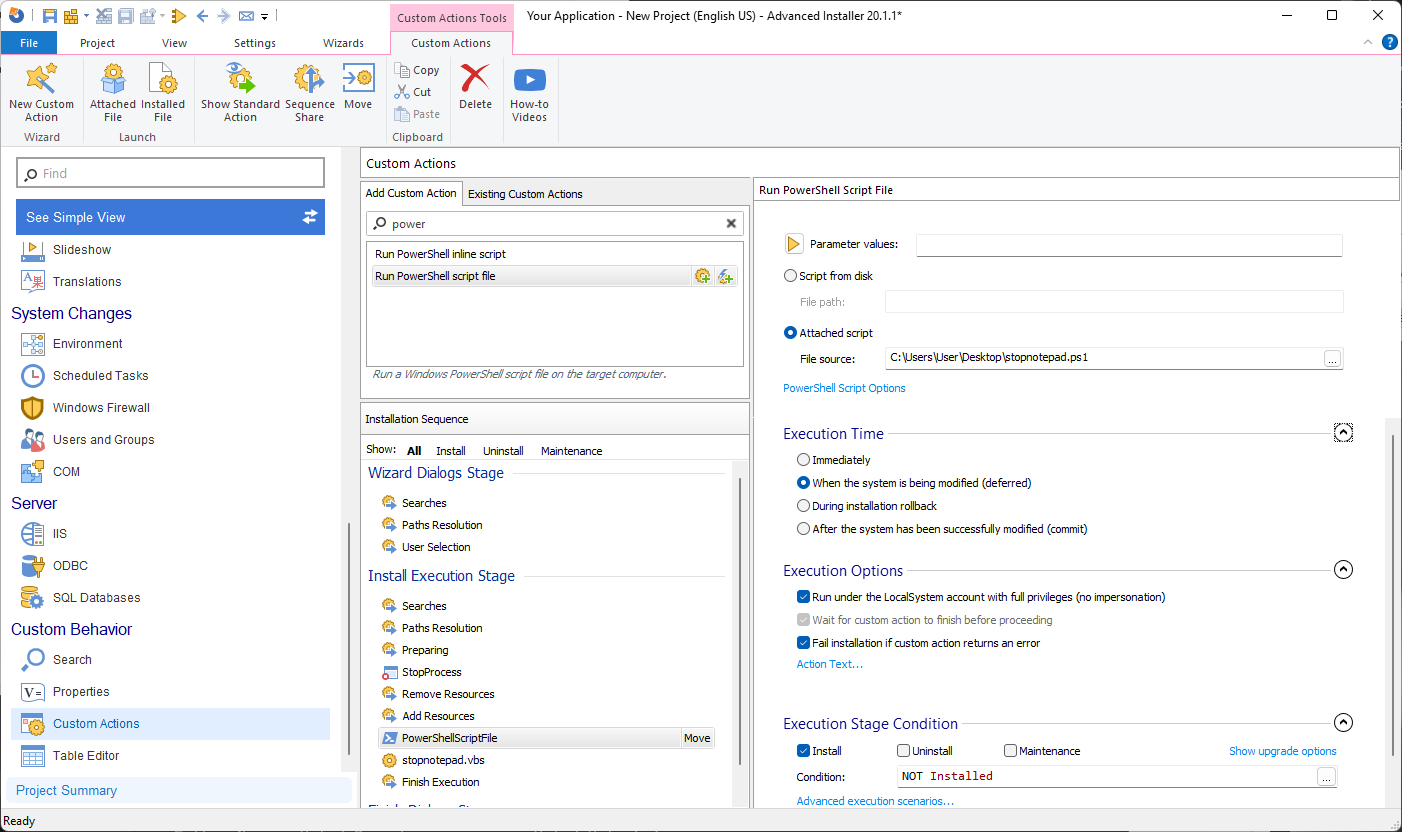
5. Build and run the Installer
Particular Terminate Process Scenario
While the above examples are covering most of the cases when it comes to process closure, there are specific scenarios that require a more complex scripting approach. One of these cases can be seen with Java applications.
If you have multiple Java applications opened and check the Task Manager, you will see that you actually have multiple Java.exe processes running.
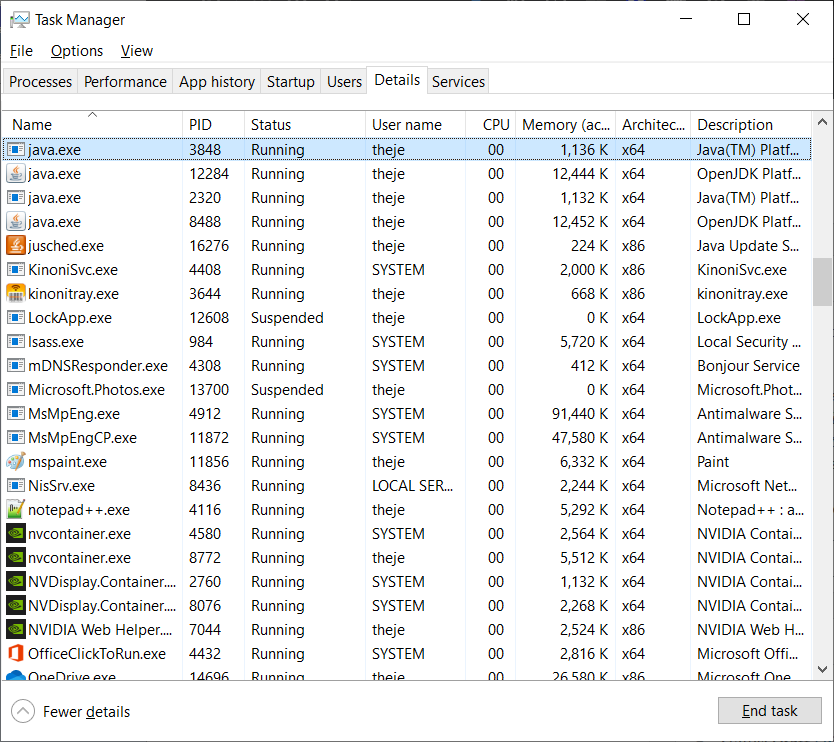
As you might imagine, if you are using the above techniques you will close all the Java processes which is not something we are aiming for. What we need is a way to identify each Java process for which application it is. The best way to do this is to find the command line for each Java process and find out which command line corresponds to your application. For full details on how to get the command line check out this article .
For example, let’s assume we have a Java application called Demo. If we search for the command line of each process we should find something like:
“C:\Program Files\Java\jdk-15.0.2\bin\java.exe” Demo
Copy
All we have to do is modify our script to search through all processes and find the exact one which has the specific string in it, in our case “Demo”.
For VBScript we can use the following:
On error Resume Next
Dim objWMIService, objProcess, colProcess, Linie, strComputer, strList
strComputer = “.”
Set objWMIService = GetObject(“winmgmts:” & “{impersonationLevel=impersonate}!\“ & strComputer & “\root\cimv2”)
Set colProcess = objWMIService.ExecQuery _
(“Select * from Win32_Process”)
For Each objProcess in colProcess
if (objProcess.CommandLine <> “”) Then
Linie = objProcess.CommandLine
if (InStr(Linie,”Demo”)) Then
objProcess.Terminate
end if
end if
Next
Set objWMIService = Nothing
Set colProcess = Nothing
Copy
This VBScript code retrieves a list of running processes on a local computer and terminates any process whose command line contains the word “Demo”. Here’s a breakdown of what each line does:
- On Error Resume Next: Instructs the script to continue executing even if an error occurs.
- Dim objWMIService, objProcess, colProcess, Linie, strComputer, strList: Declares variables to hold references to WMI service, process objects, command line text, computer name, and process list.
- strComputer = “.”: Sets the strComputer variable to represent the local computer.
- Set objWMIService = GetObject(“winmgmts:” & “{impersonationLevel=impersonate}!\\“ & strComputer & “\root\cimv2”): Establishes a connection to the WMI service on the local computer.
- Set colProcess = objWMIService.ExecQuery(“Select * from Win32_Process”): Retrieves a collection of all running processes on the local computer using the ExecQuery method.
- For Each objProcess in colProcess: Loops through each process in the collection.
- If (objProcess.CommandLine <> “”) Then: Checks if the process has a non-empty command line.
- Linie = objProcess.CommandLine: Assigns the command line text of the process to the Linie variable.
- If (InStr(Linie,”Demo”)) Then: Checks if the command line text contains the substring “Demo”.
- objProcess.Terminate: Terminates the process if the “Demo” substring is found in the command line.
- Next: Moves to the next process in the collection.
- Set objWMIService = Nothing and Set colProcess = Nothing: Releases the references to the WMI service and process collection, respectively.
For PowerShell we can use the following :
$CommandLines = Get-CimInstance Win32_Process
foreach ($command in $CommandLines)
If ($command.CommandLine -like "*Demo*"){
    write-host $Command.processId
    Stop-Process -id $Command.processId
Copy
This PowerShell script retrieves a list of running processes using the Get-CimInstance cmdlet from the Win32_Process WMI class. It then loops through each process and checks if the command line of the process contains the word “Demo”. If a match is found, it writes the process ID to the console using Write-Host and terminates the process using the Stop-Process cmdlet. Here’s a breakdown of what each line does:
- $CommandLines = Get-CimInstance Win32_Process: Retrieves a collection of running processes using the Get-CimInstance cmdlet and querying the Win32_Process WMI class.
- foreach ($command in $CommandLines): Begins a loop to iterate through each process in the $CommandLines collection.
- If ($command.CommandLine -like “*Demo*“): Checks if the command line of the process contains the substring “Demo”.
- Write-Host $Command.processId: Writes the process ID to the console. This line is used for displaying information and can be removed if not needed.
- Stop-Process -id $Command.processId: Terminates the process using the Stop-Process cmdlet and the process ID obtained from $Command.processId.
- }: Closes the if statement.
- }: Closes the foreach loop.
Once you have the script edited as desired, follow the above steps to add it in Advanced Installer and test the installer.
Detect Process in Advanced Installer
There might be cases where you want to search if a different process is available on the machine before starting the installation or you want to use this knowledge in order to close other processes with the above mentioned methods.
Advanced Installer offers a quick and easy way to detect if a certain process is running.
1. Navigate to the Custom Actions Page
2. Search for “Detect Process” custom action and add it in sequence
3. Type the process name (in our case notepad.exe)

4. Build and run the installation
However, this custom action only sets the AI_PROCESS_STATE property which you can later on use throughout your installer. For more information about it, check out this article .
Detect process with VBScript
To detect a process with VBScript we are going to use the Win32_Process WMI which we earlier used to terminate a process. If we want to detect if notepad is opened, we can use the following:
On error Resume Next
Dim strComputer
Dim objWMIService
Dim colProcessList
Dim objProcess
strComputer = “.”
Set objWMIService = GetObject(“winmgmts:” & “{impersonationLevel=impersonate}!\“ & strComputer & “\root\cimv2”)
Set colProcessList = objWMIService.ExecQuery(“Select * from Win32_Process Where Name = ‘notepad.exe’”)
If colProcessList.Count > 0 Then
msgbox “Notepad is opened”
End If
Set objWMIService = Nothing
Set colProcessList = Nothing
Copy
This will open up a message box which states that “notepad is opened”. You can consider what you want to do if a certain process is found on the machine, for example returning a successful state of the execution and continuing with the installation of the application or setting up a variable in the MSI as such:
On error Resume Next
Dim strComputer
Dim objWMIService
Dim colProcessList
Dim objProcess
strComputer = “.”
Set objWMIService = GetObject(“winmgmts:” & “{impersonationLevel=impersonate}!\“ & strComputer & “\root\cimv2”)
Set colProcessList = objWMIService.ExecQuery(“Select * from Win32_Process Where Name = ‘notepad.exe’”)
If colProcessList.Count > 0 Then
Session.Property(“ISPROCESSRUNNING”) = “Yes”
End If
Set objWMIService = Nothing
Set colProcessList = Nothing
Copy
This VBScript checks if the process “notepad.exe” is running on the local computer and will set the ISPROCESSRUNNING MSI variable to Yes. Here’s a breakdown of what each line does:
- On Error Resume Next: This statement allows the script to continue execution even if an error occurs.
- Dim strComputer: Declares a variable named strComputer to store the name of the computer. In this case, it is set to “.” which represents the local computer.
- Dim objWMIService: Declares a variable named objWMIService to hold a reference to the WMI service.
- Dim colProcessList: Declares a variable named colProcessList to hold a collection of processes.
- Dim objProcess: Declares a variable named objProcess to represent a single process object.
- strComputer = “.”: Sets the value of the strComputer variable to “.” to represent the local computer.
- Set objWMIService = GetObject(“winmgmts:” & “{impersonationLevel=impersonate}!\\“ & strComputer & “\root\cimv2”): Retrieves a reference to the WMI service using the GetObject method and the appropriate WMI namespace.
- Set colProcessList = objWMIService.ExecQuery(“Select * from Win32_Process Where Name = ‘notepad.exe’”): Executes a query against the WMI service to retrieve a collection of processes with the name “notepad.exe”.
- If colProcessList.Count > 0 Then: Checks if the count of processes in the collection is greater than zero, indicating that the “notepad.exe” process is running.
- Session.Property(“ISPROCESSRUNNING”) = “Yes”: If the “notepad.exe” process is running, it sets a property named “ISPROCESSRUNNING” to the value “Yes”. This property can be accessed by an installer session to perform conditional actions based on the process status.
- Set objWMIService = Nothing and Set colProcessList = Nothing: Releases the references to the WMI service and the process collection to free up system resources.
Make sure that the ISPROCESSRUNNING property is available in the MSI before executing the script.
Detect Process with PowerShell
With PowerShell we can achieve the same results when it comes to process detection. The following code can be used:
$notepad = Get-Process notepad -ErrorAction SilentlyContinue
if ($notepad) {
Write-host “notepad is running”
Copy
Of course you can also set an MSI Property with PowerShell in case a process is running to achieve the same result as Advanced Installer does. To do this, we can use the following code:
$notepad = Get-Process notepad -ErrorAction SilentlyContinue
if ($notepad) {
AI_SetMsiProperty ISPROCESSRUNNING “Yes”
Copy
You can also write the PowerShell code directly into Advanced Installer by doing the following:
1. Navigate to the Custom Actions Page
2. Search for “Run PowerShell inline script” custom action and add it in sequence
3. Write the above script
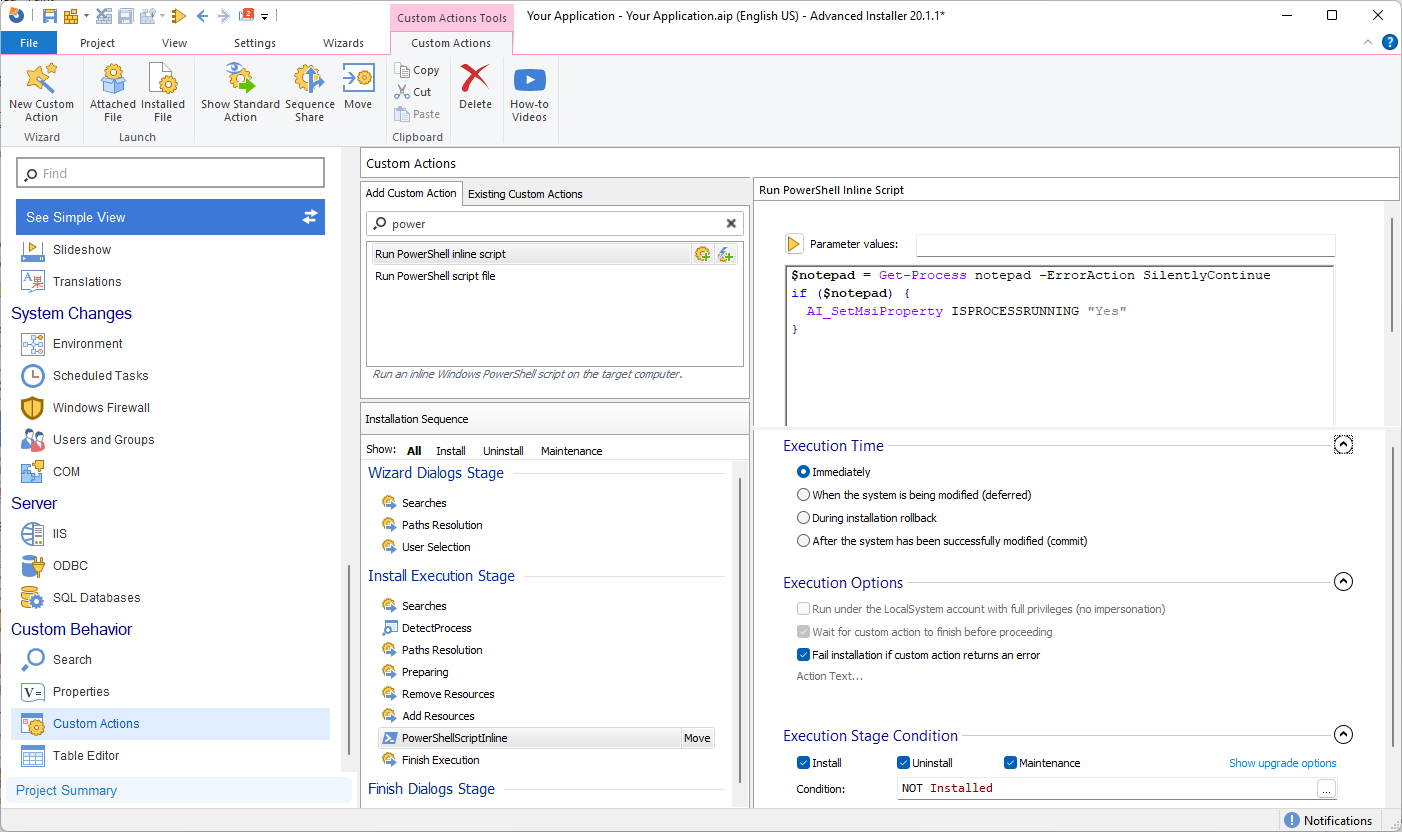
4. Build and run the installation
Wait for Process with VBScript
As a last example we can think of is the case where you need to wait for a specific process to close before continuing with the installation process. To achieve this with VBScript, the following code can be used:
On error Resume Next
Dim strComputer
Dim objWMIService
Dim colProcessList
Dim objProcess
strComputer = “.”
Set objWMIService = GetObject(“winmgmts:” & “{impersonationLevel=impersonate}!\“ & strComputer & “\root\cimv2”)
Set colProcessList = objWMIService.ExecQuery(“Select * from Win32_Process Where Name = ‘notepad.exe’”)
Do While colProcessList.Count > 0
Set colProcessList = objWMIService.ExecQuery(“Select * from Win32_Process Where Name = ‘notepad.exe’”)
Wscript.Sleep(1000) ‘Sleep 1 second
Loop
Set objWMIService = Nothing
Set colProcessList = Nothing
Copy
While notepad.exe is running, the script continues to run, thus blocking the installation to continue. Of course this can be later modified to show a certain message to the user until the process is closed. Here’s an explanation of what each line does:
- On Error Resume Next: This statement allows the script to continue execution even if an error occurs.
- Dim strComputer: Declares a variable named strComputer to store the name of the computer. In this case, it is set to “.” which represents the local computer.
- Dim objWMIService: Declares a variable named objWMIService to hold a reference to the WMI service.
- Dim colProcessList: Declares a variable named colProcessList to hold a collection of processes.
- Dim objProcess: Declares a variable named objProcess to represent a single process object.
- strComputer = “.”: Sets the value of the strComputer variable to “.” to represent the local computer.
- Set objWMIService = GetObject(“winmgmts:” & “{impersonationLevel=impersonate}!\\“ & strComputer & “\root\cimv2”): Retrieves a reference to the WMI service using the GetObject method and the appropriate WMI namespace.
- Set colProcessList = objWMIService.ExecQuery(“Select * from Win32_Process Where Name = ‘notepad.exe’”): Executes a query against the WMI service to retrieve a collection of processes with the name “notepad.exe”.
- Do While colProcessList.Count > 0: Starts a loop that continues as long as there are processes in the collection.
- Set colProcessList = objWMIService.ExecQuery(“Select * from Win32_Process Where Name = ‘notepad.exe’”): Re-executes the query to refresh the collection of processes with the name “notepad.exe”.
- Wscript.Sleep(1000): Pauses the script for 1 second using the Sleep method to avoid continuous CPU usage during the loop.
- Loop: Returns to the start of the loop and checks the process collection count again. If there are still processes, the loop continues.
- Set objWMIService = Nothing and Set colProcessList = Nothing: Releases the references to the WMI service and the process collection to free up system resources.
Wait for Process with PowerShell
With PowerShell it’s even easier to wait for a process because PowerShell offers the Wait-Process cmdlet which can be easily used as such:
Wait-Process -name notepad
Copy
Of course you can easily add it in Advanced Installer as previously shown with the process detection.
Also read:
- [New] How to Use Zoom in Your Daily Gmail Routine
- [Updated] The Complete Zoomer's Handbook for Captivating Video and Audio Content
- 2021'S Leading Free OCR Applications for Windows PCs: A Comprehensive Guide
- 2024 Approved Unleash Creative Potential A Detailed Breakdown of Photoshop's Background Eraser Feature
- Archive Slideshow in High-Quality Video
- Binkw32.dll Error Fix Guide: Strategies to Overcome File Not Found Issues
- Discover the Premier Collection of 9 Excellent, Cost-Free Email Solutions on Android
- Easy Steps: Successfully Downloading & Setting Up ApowerUnlock
- Effortless Video Size Modification: Top No-Cost Applications Tailored for Tweeting Enthusiasts
- Enhance Communication Skills in German Via Netflix
- How to Use Life360 on Windows PC For Motorola Edge+ (2023)? | Dr.fone
- In 2024, How To Do Motorola Edge 40 Pro Screen Sharing | Dr.fone
- Step-by-Step Guide to Exporting Bank Reports as Excel Spreadsheets with ApowerSoft Solutions
- The Portuguese Voice Vowels Variation Study
- Top 5 Must-Know Aspects of Using TikTok (macOS) for 2024
- Top Picks for Android Users: The Best PDF Editors Reviewed (Best as of 2019)
- Top Tips for Capturing GoToWebinar Sessions Successfully
- Top-Rated Free Scanning Application for Android Users
- Ultimate List of Top 5 DVD to MPEG-4 Transformers for Hassle-Free Media Conversion
- Title: Implementing Tailored Responses: Identify & Halt System Processes
- Author: Larry
- Created at : 2024-10-10 01:12:07
- Updated at : 2024-10-10 21:06:01
- Link: https://win-updates.techidaily.com/implementing-tailored-responses-identify-and-halt-system-processes/
- License: This work is licensed under CC BY-NC-SA 4.0.