
Advanced Techniques in Editing Registry Settings Using Advanced Installer

Advanced Techniques in Editing Registry Settings Using Advanced Installer
Disclaimer: This post includes affiliate links
If you click on a link and make a purchase, I may receive a commission at no extra cost to you.
Manipulating of registry classes with Advanced Installer
Advanced Installer supports working with COM components extensively, including the ability to define custom interfaces, type libraries, and classes. The Advanced Installer GUI can be used to define and register these components.
One of the primary advantages of using Advanced Installer for COM component work is its ability to generate registry entries and other configuration data automatically based on the information defined in the installation package. This can greatly simplify the process of creating and managing COM components, particularly in complex applications requiring multiple components and interfaces.
Advanced Installer offers two separate pages for the users to work with different types of classes. When it comes to COM components, Interfaces, Type Libraries and COM+ components, you can define this information directly into the GUI by navigating to the COM Page .

When it comes to File Type Associations, Advanced Installer offers a separate GUI where you can define these and this can be found in the File Associations Page .
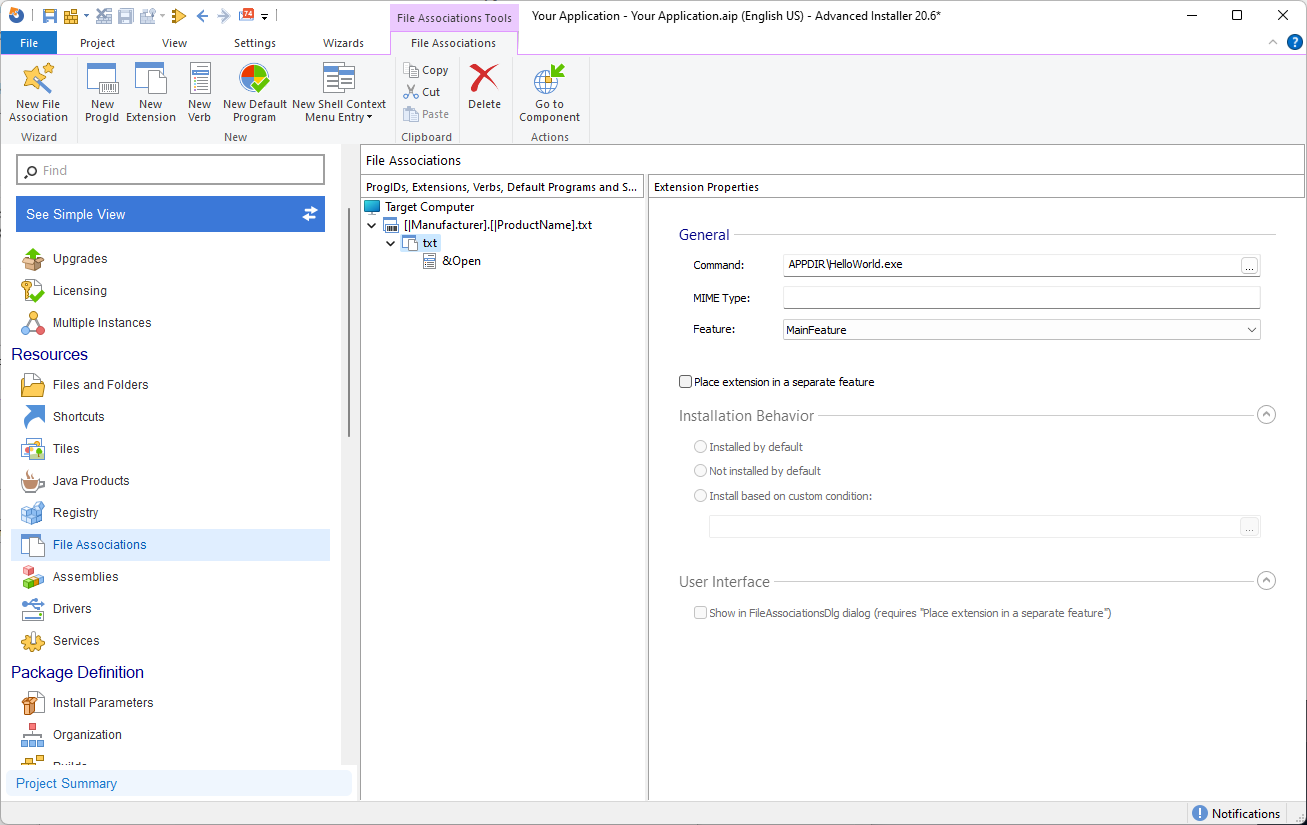
COM Page
Advanced Installer includes a number of useful tools for working with COM components, such as the ability to create new classes, interfaces, and type libraries. These tools are accessible via the Advanced Installer interface’s “COM, Interfaces, COM+, Type Libraries” panel, which allows developers and system administrators to easily create, edit, and manage COM components for use in their applications.
Simply click the corresponding toolbar button, tree context menu item, or keyboard shortcut to add a new class, interface, or type library. To add a new class, for example, while the “COM, Interfaces, COM+, Type Libraries” panel is focused, click the “New Class” button or press the Insert key. Similarly, use the “New Interface” or “New Type Library” toolbar buttons to add a new interface or type library.

Advanced Installer includes tools for editing and deleting existing components in addition to adding new ones. Use the “Rename” tree context menu item or press the F2 key while the element is selected to rename it. Use the “Delete” toolbar button, the “Delete” tree context menu item, or the Delete key while the element is selected to delete it.

Advanced Installer also includes tools for importing COM+ components and converting type libraries for more advanced tasks. Use the “Import COM+” toolbar button or context menu item to import a COM+ component. Use the “Convert Type Library” toolbar button or tree context menu item to convert a type library. When converting a type library, the COM registration registries contained within the file are extracted and silently imported into the Registry page, bypassing the TypeLib table.
COM Properties
Once a COM component has been added to the project, the properties tab view allows you to specify the settings of that particular COM .
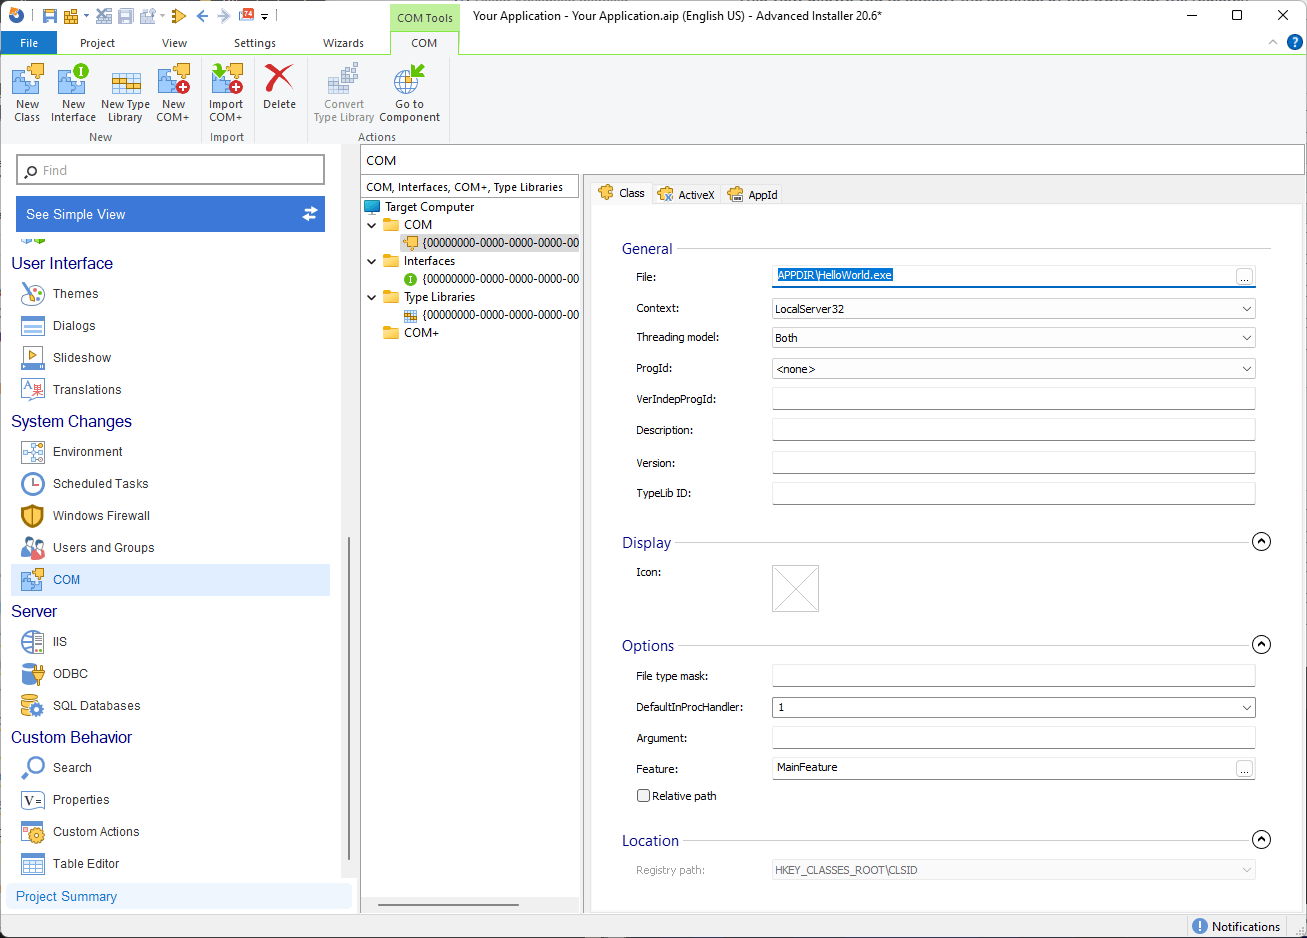
The interface in the view is simple and straightforward, allowing IT professionals to easily configure the settings for their installation package. When registering COM files with Advanced Installer, you have several options:
- General Settings: The “General” tab displays some general information about the COM file that is being registered. You can specify the file to be registered, the server context, and the threading model here. You can also give the COM file a description and a version number.
- ProgId and VerIndepProgId: You can specify the Program IDs associated with the Class ID using the “ProgId” and “VerIndepProgId” options. Advanced Installer’s File Associations page is where program IDs are defined. You can also specify a version-independent Program ID in the Installer Project’s File Associations or Registry page.
- TypeLib Id: You can enter the ID of the TypeLibrary that describes the COM here. This option is especially useful when dealing with a large number of COM files.
- Display and Options: The “Display” and “Options” tabs allow you to specify various settings related to the appearance and behavior of the COM file. You can select an icon that will be associated with the CLSID, specify the file type mask, and select the default in-process handler for the server context.
- Argument and Feature: The “Argument” and “Feature” options are related to the CLSID keys LocalServer or LocalServer32. The “Argument” option allows you to register a text as the server’s argument, which is used by COM to invoke the server. The “Feature” option lets you choose which feature provides the COM server.
- Relative Path and Location: Finally, you can specify whether the register path is relative or absolute, as well as the registry location where the COM is registered, using the “Relative Path” and “Location” options. The registry location for COMs defined through the MSI Class table is read-only.
COM ActiveX Properties
If the COM has any ActiveX settings, you can easily configure them in the ActiveX Properties Tab .
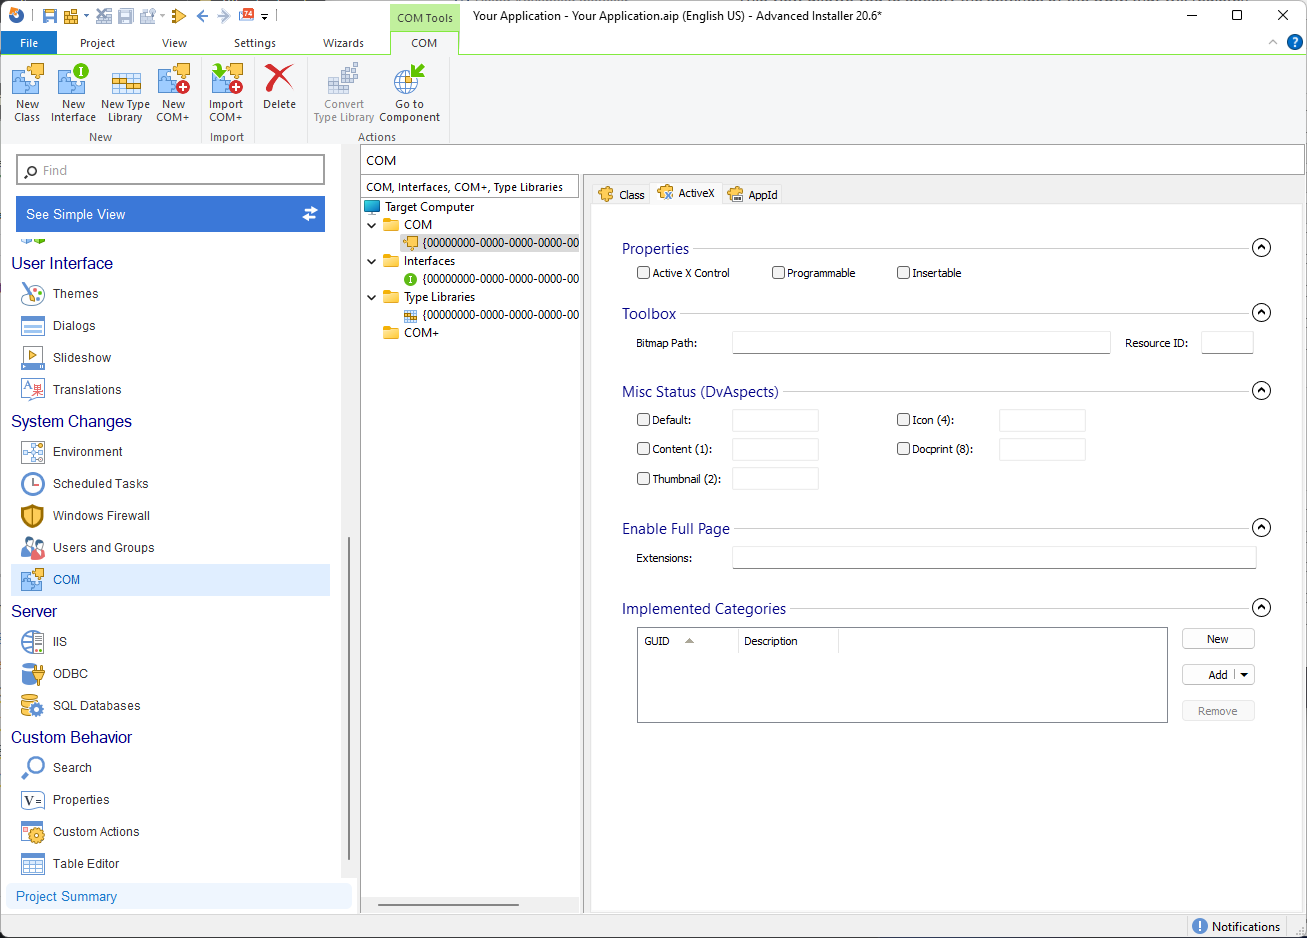
ActiveX is a subset of COM that is designed specifically for use in web browsers, whereas COM is a more general-purpose technology used to create software components that can be used by any application.
ActiveX controls are essentially a type of COM component that is specifically designed to work within a web browser. Typically, these controls are used to add functionality to a website or web application, such as displaying multimedia content or interacting with user input. They are built with the same technologies and techniques as other COM components, but with some web-specific features and restrictions.
When looking over the ActiveX view, you have the following options:
- ActiveX Controls: ActiveX controls are a type of COM component that can be used to add interactive features to web pages or desktop applications. When registering an ActiveX control, it is important to mark it as such in the properties.
- Programmable COMs: Programmable COMs are COM components that can be used in programming languages such as Visual Basic and C++. Registering a programmable COM requires specifying it as such in the properties.
- Insertable Objects: Insertable objects are a type of COM component that can be inserted into other applications, such as a Word document. When registering an insertable object, it is important to indicate that objects of this class should appear in the Insert Object dialog box list box when used by COM container applications.
Additional Properties: Aside from these main properties, there are several other properties that can be defined when registering a COM. These include:
- Toolbox: This specifies the 16x16 bitmap to use for the face of a toolbar or toolbox button.
- Misc Status: This property specifies how to create and display an object, the desired data or view aspect of the object when drawing or getting data.
- Extensions: This property is used to register the control as the viewer for specified extensions.
- Implemented Categories: This property is used to specify the categories this COM implements.
To define new Implemented Categories, you can use the “New” button, the “Add” combobox, or the “Add” context menu. There are also predefined implemented categories, such as “Implemented in .NET”, “Safe for scripting”, and “Safe for initializing”.
DCOM Properties
If you wish to configure and register DCOM servers, you can easily input a GUID to transform it into a Distributed COM. This can be done in the AppID Tab .

DCOM is a Microsoft technology that allows software components to communicate with one another directly over a network. It is a Component Object Model (COM) extension that provides the infrastructure for developing distributed applications. DCOM enables remote access to components over a network and allows developers to create applications that are distributed across multiple machines.
DCOM follows a client-server model, in which the client sends a request to the server, which processes the request and returns a response to the client. The client and server can communicate using a variety of protocols, including TCP/IP, UDP, HTTP, and HTTPS.
DCOM is commonly used in enterprise settings where applications must be distributed across multiple servers and workstations. It enables developers to create distributed applications that can be easily scaled to meet business requirements. However, installing and configuring DCOM can be difficult, requiring a thorough understanding of the underlying network infrastructure.
The AppId value can be specified in the General section of the AppId Properties tab. This value is written to the CLSID and generates the AppId GUID key in HKCR\AppId.
The AppId Properties tab’s Properties section contains several fields that allow you to configure the DCOM server. The Remote Server Name field is a Formatted Type field that will be written under HKCR\AppID{AppID}. The Local Service field specifies the local service that will be stored in the HKCR\AppID{AppID} field. The Service Parameters field specifies which service parameters will be stored under HKCR\AppID{AppID}. The Dll Surrogate field specifies the Dll surrogate that will be stored in the HKCR\AppID{AppID} folder, and this field is usually left blank.
The Active At Storage checkbox is used to enable the “ActivateAtStorage”=”Y” value, which is stored in HKCR\AppID{AppID}. The Run As Interactive User checkbox allows you to tell the DCOM server to run as an interactive user. This value will be written as “RunAs”=”Interactive User” under HKCR\AppID{AppID}.
Interface Properties
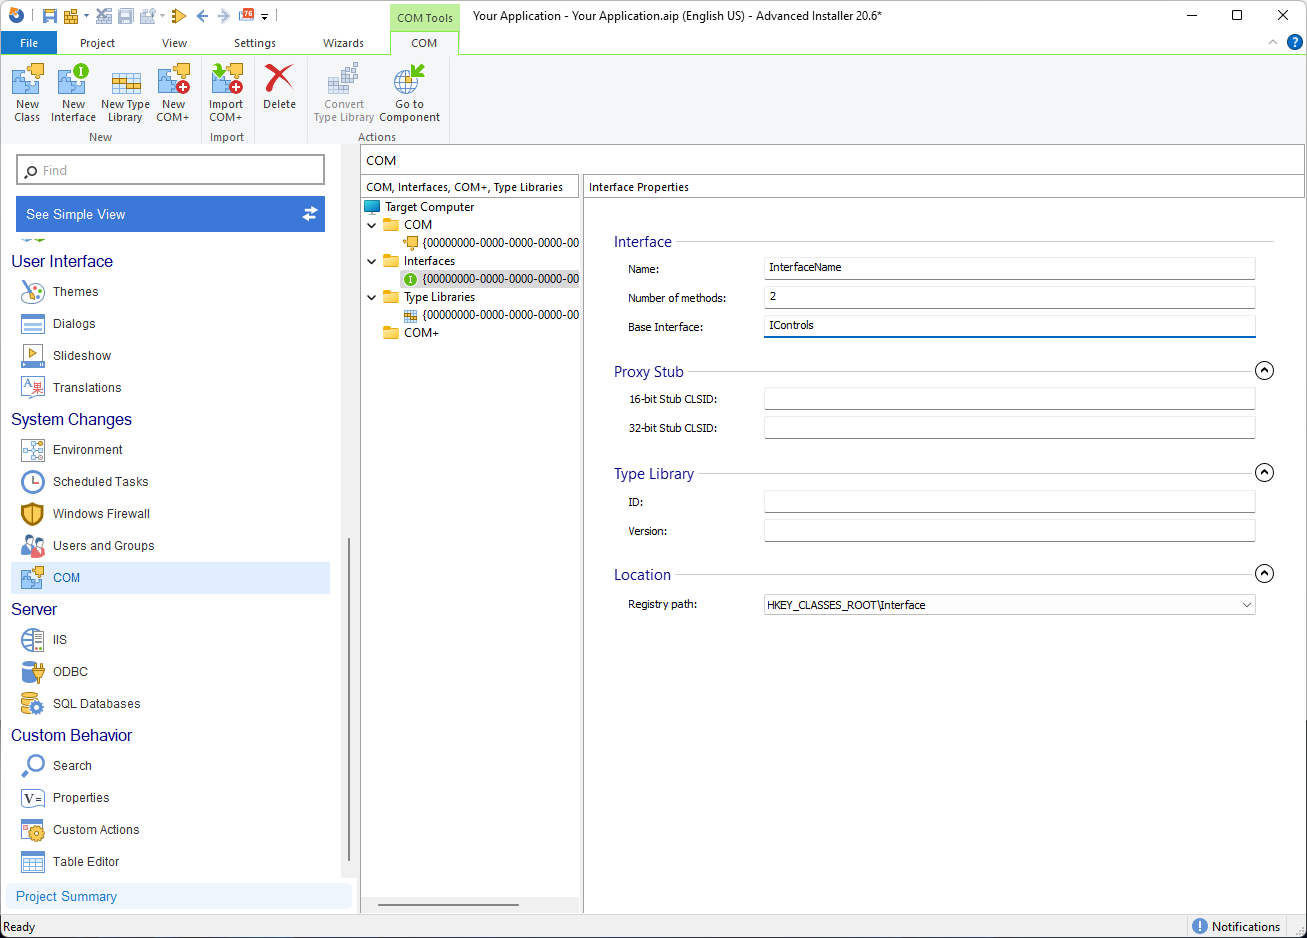
Advanced Installer has a dedicated view where you can specify the settings needed to create a new COM Interface. This view provides a comprehensive set of properties for customizing the interface and its components which includes the following fields:
- Name: This field allows you to specify the name of the interface. Choose a descriptive name that reflects the purpose and functionality of the interface.
- Number of methods: Here, you can specify the number of methods declared in the interface. This information helps in accurately defining the interface’s behavior and functionality.
- Base Interface: Specify the base interface that the current interface extends or inherits from. This is useful when creating derived interfaces that build upon existing interfaces.
The Proxy Stub Properties section contains the following fields:
- Proxy Stub: This field allows you to provide marshaling support for your interface. Marshaling is a process that facilitates communication between different processes or systems by converting data between different formats or representations.
- 16-bit Stub CLSID: Specify the CLSID (Class ID) of the 16-bit proxy/stub DLL associated with the interface. This DLL handles the marshaling process for the interface in 16-bit environments.
- 32-bit Stub CLSID: Similarly, specify the CLSID of the 32-bit proxy/stub DLL associated with the interface. This DLL is responsible for marshaling the interface in 32-bit environments.
The Type Library Properties section includes the following fields:
- ID: Specify the ID of the type library associated with the interface. The type library contains information about the interface’s structure, methods, properties, and other relevant details.
- Version: Define the version of the type library. This helps in managing compatibility and versioning of the interface.
The Location section specifies the registry path where the COM Interface is registered. This path indicates the location in the Windows Registry where the necessary information about the interface is stored.
By configuring these properties in Advanced Installer, you can effectively define and customize COM Interfaces for your applications. These interfaces facilitate communication and interoperability between software components, enabling seamless integration and interaction within your applications.
Proper configuration of COM Interfaces ensures consistency, compatibility, and efficient communication between different software components. Advanced Installer simplifies the process, providing a user-friendly interface for specifying the required settings and ensuring a smooth integration of COM Interfaces into your applications.
Type Libraries
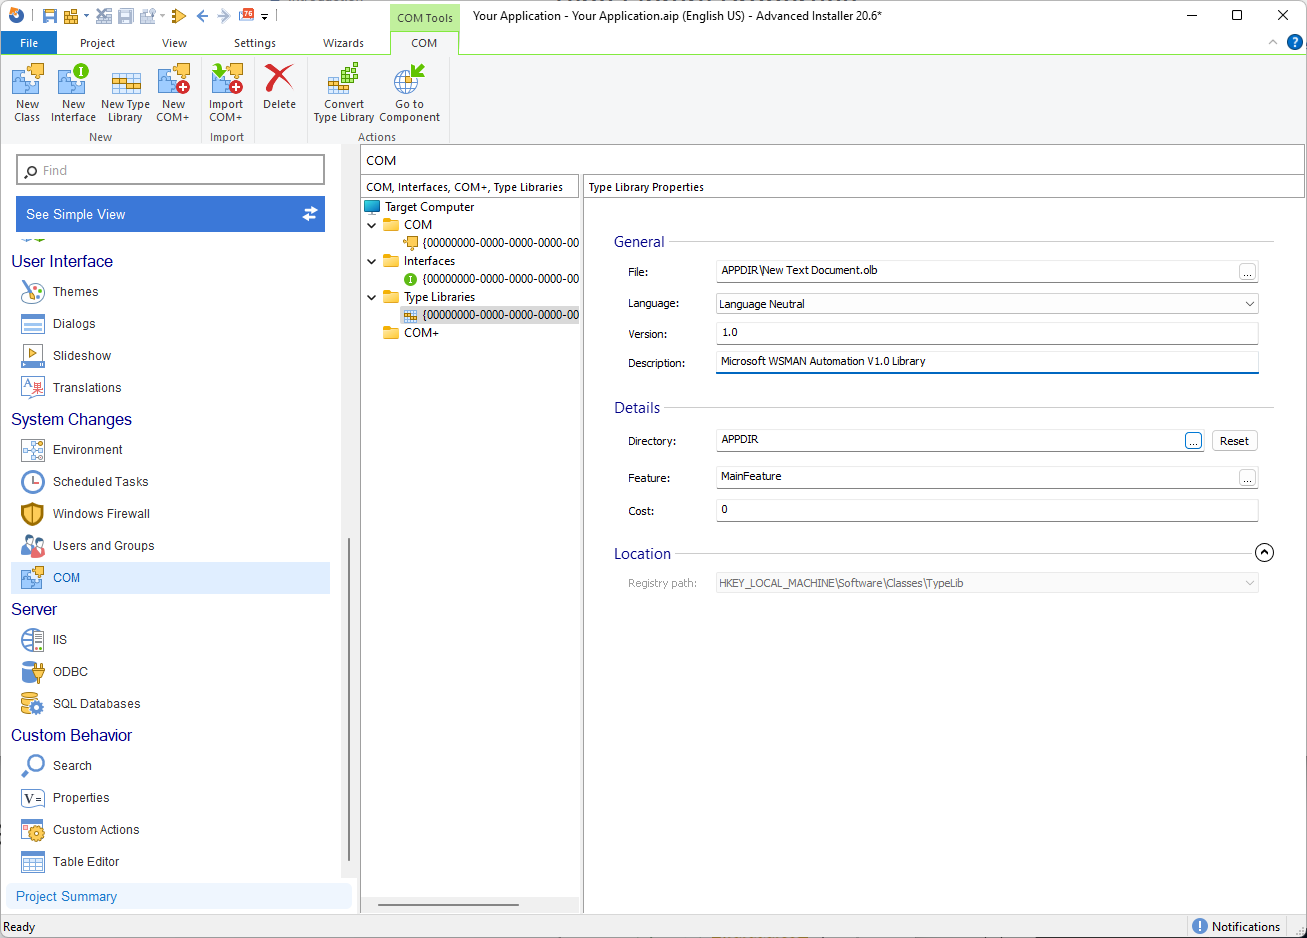
The Type Library Properties view in Advanced Installer allows you to specify the information that will be stored in the registry during the Type Library’s registration process. This allows for the Type Library to be seamlessly integrated and accessible within your applications.
The General section includes the following properties:
- File: This field displays the file that contains the Type Library. You can use the [… ] button to browse and select a different file if needed.
- Language: Specify the language of the Type Library. You can select the appropriate language from the drop-down list provided.
- Version: Define the version of the Type Library. The version follows the format of “major version dot minor version,” allowing you to specify the specific version of the Type Library.
- Description: Provide a description for the Type Library. This description helps to provide additional information about the Type Library’s purpose and functionality.
The Details section includes the following properties:
- Directory: Specify the directory that contains the Help file for the Type Library. You can use the [… ] and [Reset ] buttons to navigate and select the appropriate directory.
- Feature: Select the feature that must be installed in order for the Type Library to be operational. This ensures that the necessary components are installed along with the Type Library to support its functionality.
- Cost: Specify the cost associated with the Type Library properties in bytes. This helps to manage the resource allocation and prioritize the installation of Type Libraries based on their cost.
The Location section specifies the registry path where the Type Library is registered. This path indicates the location in the Windows Registry where the Type Library’s registration information is stored. Note that for Type Libraries defined through the MSI TypeLib table, this location is read-only and determined by the installation package.
By configuring these properties in Advanced Installer, you can ensure that the Type Library is registered correctly and can be accessed by your applications. The provided information, such as file, language, version, and description, contributes to the seamless integration and functionality of the Type Library.
Proper configuration of Type Library properties is essential for maintaining consistency, compatibility, and accessibility of Type Libraries within your software solutions. With Advanced Installer’s user-friendly interface, you can easily specify the required information and streamline the registration process.
COM+

The Advanced Installer COM+ Properties view provides a comprehensive set of options for specifying the information required for registering a COM+ component. This view allows you to define the files associated with the COM+ as well as the flags used during the MSI file creation process.
The Files section enables you to select the files that make up the COM+ component. It is important to note that all the files belonging to a specific COM+ component must be placed within the same component in Advanced Installer. This ensures proper organization and management of the COM+ files.
To add files to the COM+ component, click the [Add ] button and browse for the desired files. Conversely, if you need to remove any files from the COM+ component, use the [Remove ] button. By managing the files within the same component, you ensure that all necessary dependencies and resources are properly registered and packaged during the installation process.
The Flags section allows you to specify the flags used when creating the MSI file for the COM+ component. Flags provide additional information and instructions to Windows Installer during the installation process. These flags can control various aspects of the installation, such as installation options, behavior, or special requirements.
When configuring the flags, it is important to understand the specific requirements and functionality of the COM+ component. The flags can be set according to the specific needs and characteristics of the component to ensure that it is installed and configured correctly.
By carefully configuring the files and flags in Advanced Installer’s COM+ Properties view, you can ensure that the COM+ component is properly registered and packaged within the MSI file. This guarantees seamless integration and functioning of the COM+ component within your application.
It’s worth noting that Advanced Installer makes configuring COM+ properties easier by providing an intuitive interface that walks you through the steps. This enables IT professionals to manage COM+ components effectively and ensure their successful installation and operation.
File Associations Page
You can associate specific file extensions with applications in your package, allowing the selected program to perform specific operations (verbs) on files with those extensions. Advanced Installer includes a page dedicated to creating and managing file associations, making it simple to define relationships between ProgIDs, extensions, and verbs.
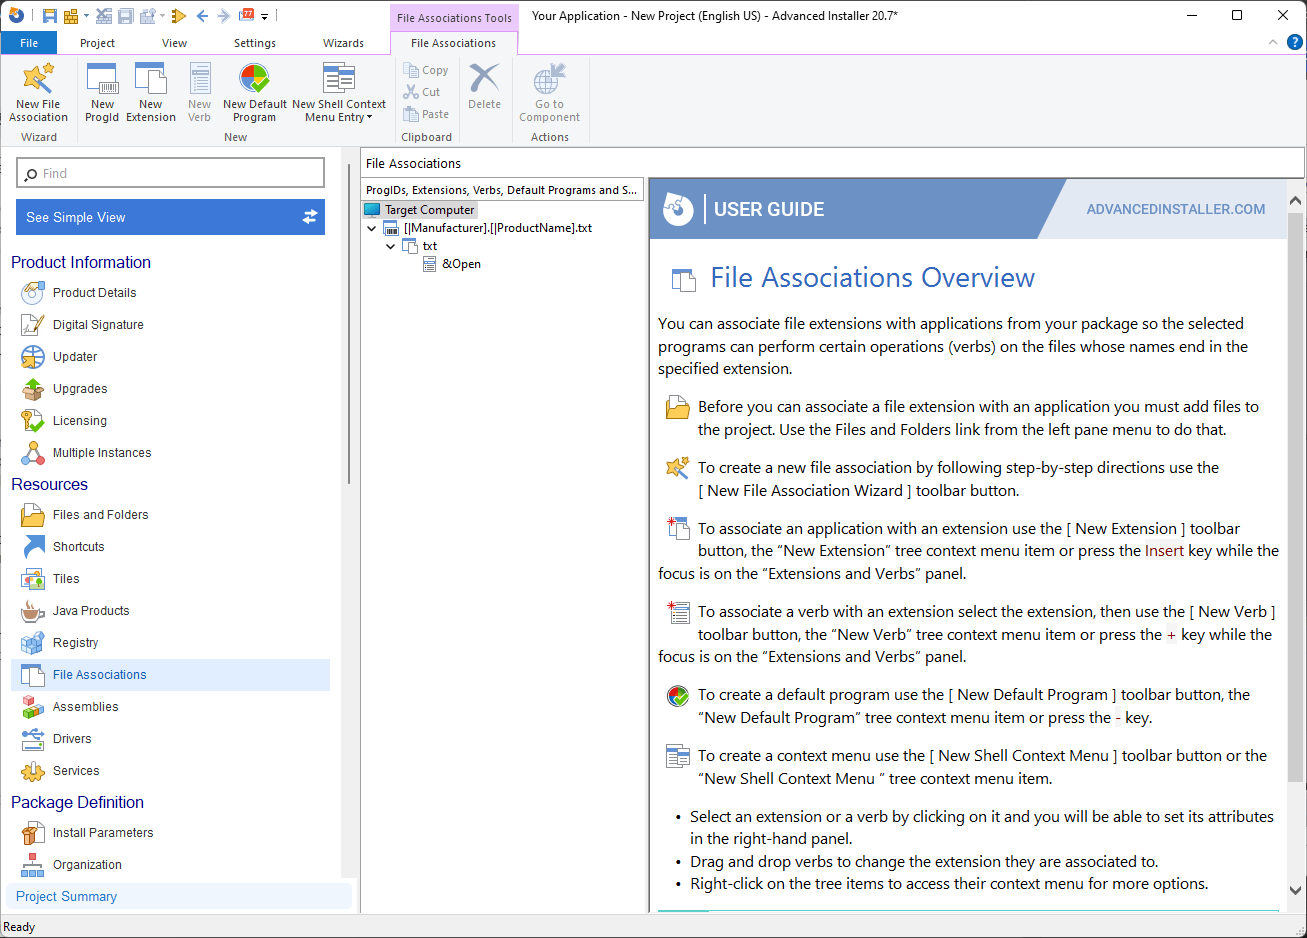
In the left-side pane of the File Associations view, you’ll find a tree with all the ProgIDs defined at the top level. Each ProgID can have multiple associated extensions, with each extension capable of defining multiple verbs.
Advanced Installer includes the New File Association Wizard, which allows you to quickly and easily create a new file association. Simply click the [New File Association Wizard] toolbar button and follow the on-screen instructions to set up the association.
You have several options for creating a new ProgID. While the “ProgID, Extensions, and Verbs” panel is focused, use the [New ProgID] toolbar button, the “New ProgID” tree context menu item, or press the * key. When you create a ProgID, you can associate it with an extension or a Component Object Model (COM) in the COM page. It should be noted that unless a ProgID is associated with an extension or a COM, it will not be created during installation.
A ProgID will not be created at install time unless it is associated with an extension or a COM.
Only one extension should be associated with each ProgID.
Use the [New Extension] toolbar button, the “New Extension” tree context menu item, or the Insert key while the “ProgID, Extensions, and Verbs” panel is focused to create new extensions. This action generates a ProgID as well as an extension with default properties. If you want to add an extension to an existing ProgID, make sure to select it (or one of its children) before clicking [New Extension].
Use the [New Verb] toolbar button, the “New Verb” tree context menu item, or the + key while the “ProgID, Extensions, and Verbs” panel is focused to create new verbs. This action will generate a verb with the selected extension’s default properties.
To establish a new default program, utilize the [New Default Program ] toolbar button, the “New Default Program” tree context menu item, or press the - key while the “ProgID, Extensions, Verbs, and Default Programs” panel is focused. This will create a default program with default properties for the selected extension.
The Default Programs feature applies only when the package is installed on Windows Vista or later. For lower systems, it’s ignored.
The Default Programs feature does not apply on Windows 8 and newer operating systems. Due to their design, these operating systems don’t allow setting the default programs programmatically.
Use the [New Shell Context Menu] toolbar button to create a new shell context menu, and then select the type of context menu you want to create: Files Context Menu, Directory Context Menu, Background Context Menu, or a subentry for the currently selected shell context menu.

Advanced Installer also offers the option to define Context Menus for Windows 11. A Sparse Package is required to configure this option. It will be automatically generated and included into your setup package.
Digital signature is mandatory for this option. All Sparse Packages have to be digitally signed, thus the above Sparse Package will be signed with the digital signature configured in your project.
Simply use the “Rename” tree context menu item or press the F2 key while the element in the left-side panel is selected to rename ProgIDs, extensions, verbs, default programs, and context menus.
Use the “Go To Component” tree context menu item or press the F8 key while an element from the “ProgID, Extensions, and Verbs” panel is selected to locate the attached component for an extension. This command brings up the Organization page, with the appropriate component selected in the left tree control.
Also read:
- [Updated] In 2024, Crafting Squares for Viral Videos in a Social Media World
- 2024 Approved Journey Beyond the Frantic Crafting Epic Slow Motion Content for Instragram
- 2024 Approved Tune Into Trends Integrating Songs with Reels
- 解決Windows 11 上0x8007007F更新故障:五則成功方法
- Comment Restaurer Un Système Sous Windows 10 Et 11 en Plusieurs Étapes : Méthodes Pour Les Utilisateurs Avancés
- Comprehensive Guide to Easy2Sync for File Management: Features & How-To
- Fresh Topics Eliciting Engagement in Audio Formats
- In 2024, How to Stop Google Chrome from Tracking Your Location On Realme GT Neo 5 SE? | Dr.fone
- In 2024, How To Use Allshare Cast To Turn On Screen Mirroring On Motorola Moto G13 | Dr.fone
- Intégration Transparente De Fichiers Sur Windows Server - Méthodes À Privilégier Pour Une Optimisation SEO
- IPhone Xeasy Simple Guide to Screen Capture
- No Fog, Only Clarity GoPro Lens Care Essentials for 2024
- Professionelle Tipps Zum Erstellen Einer Genauen Kopie Ihrer Festplatte Unter Windows 8 & 8.1 - Anleitung
- Top-Rated No Cost Backup Solutions: Protect Your Data on Any Version of Windows
- Ultimate Guide: Free Full-System Backup on Windows 11 Explained
- Why Your WhatsApp Live Location is Not Updating and How to Fix on your Realme 11X 5G | Dr.fone
- ゴミ箱から消えたファイルを手っ取り早く、プログラムで元通りに!無料ソリューションあり
- Title: Advanced Techniques in Editing Registry Settings Using Advanced Installer
- Author: Larry
- Created at : 2024-11-02 16:01:36
- Updated at : 2024-11-03 16:23:49
- Link: https://win-updates.techidaily.com/advanced-techniques-in-editing-registry-settings-using-advanced-installer/
- License: This work is licensed under CC BY-NC-SA 4.0.